
Creating a Portable Version of Arduino
Refer: https://docs.arduino.cc/software/ide-v1/tutorials/PortableIDE
Emergency Reset
If you have loaded a program that has put your Arudino in a loop, hit the reset button twice, the LED should start blinking and then upload a fix script like "blink."
Button Box
Refer: https://blog.mruckman.com/2022/04/arduino-button-box/
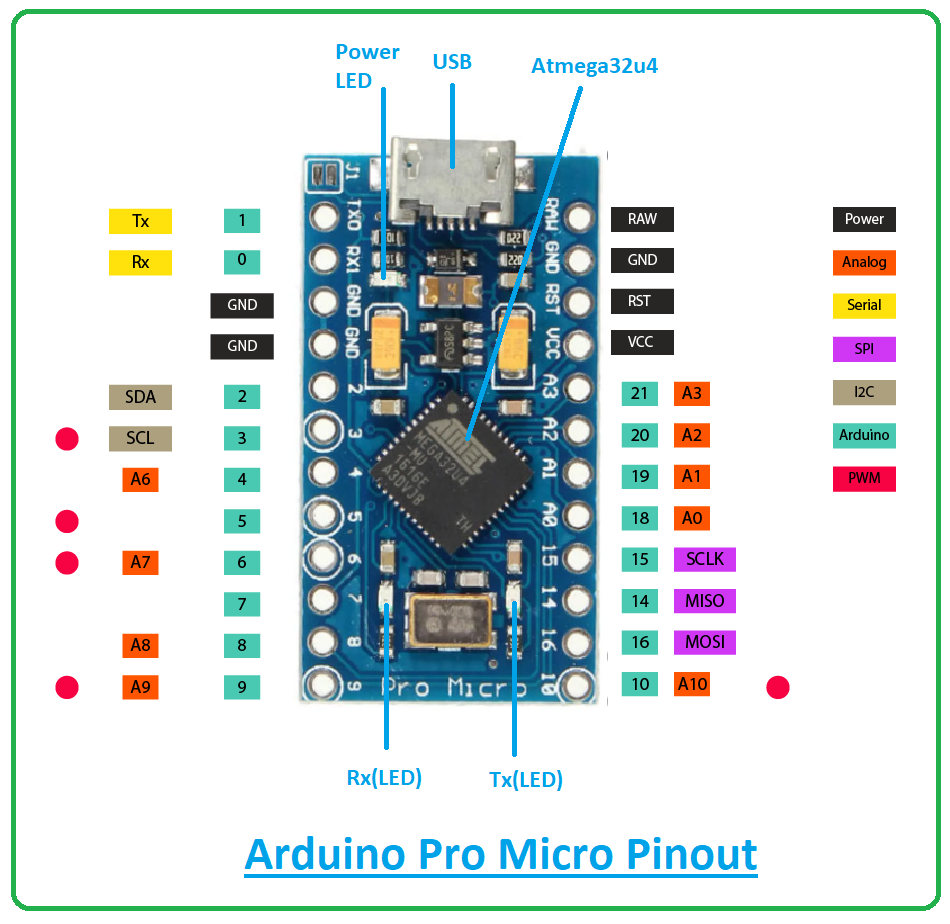
Leonardo Pro Micro
Micro, Leonardo, other 32u4-based
Digital Pins Usable For Interrupts, better for rotary encoders
0, 1, 2, 3, 7
PDF Guide for Elegoo MEGA2560
The_Most_Complete_Starter_Kit_for_MEGA_V1.0.2021.05.13.pdf
Radar Project
Has some good features on creating a monitor utility.
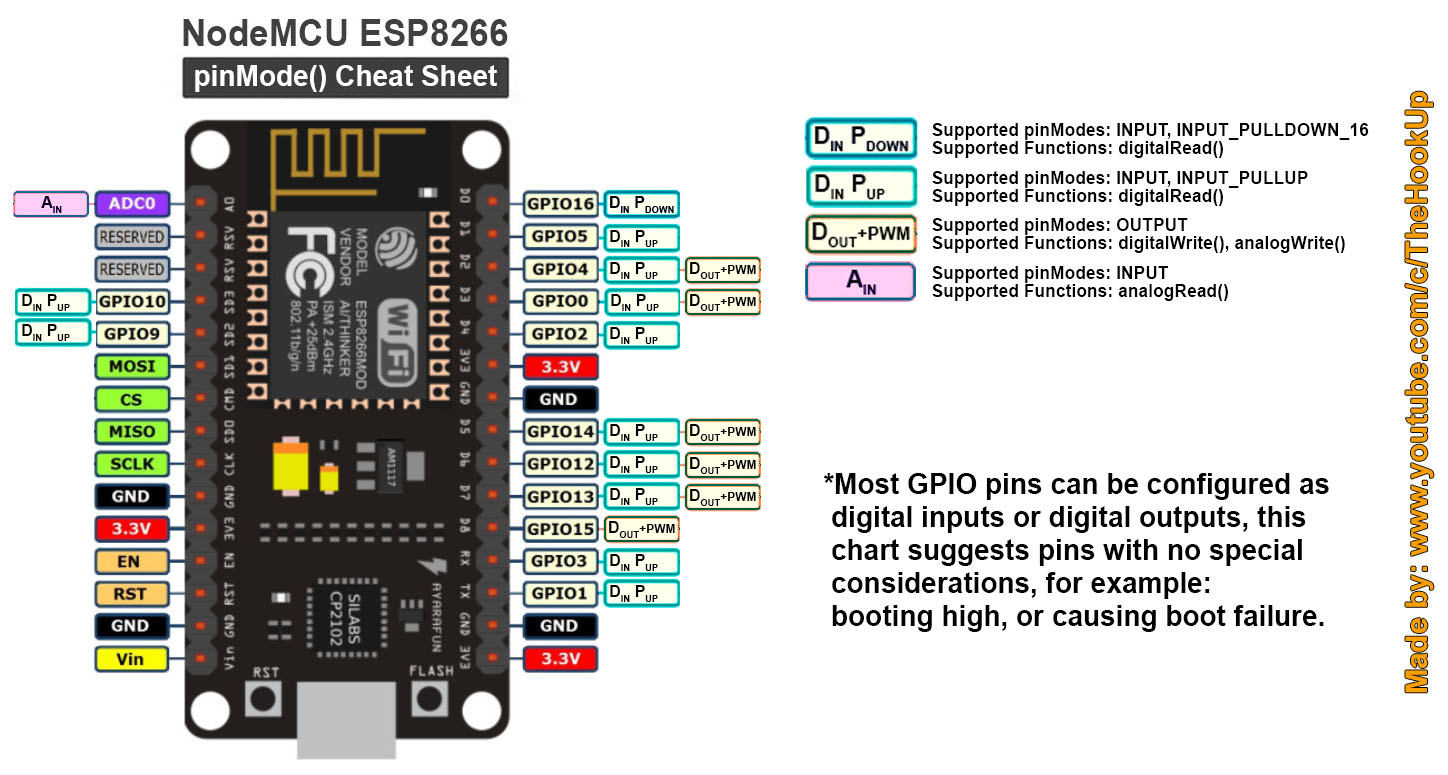
HiLetgo ESP8266 NodeMCU
Tutorials: https://randomnerdtutorials.com/projects-esp8266/
Library: https://arduino.esp8266.com/stable/package_esp8266com_index.json
It's the same library the ESPDUINO uses, it looks like you can use the DOIT ESP-MX (DevKit) also the Generic ESP8266 works, which is recommended on Amazon page. DID NOT Flash anything new.
This is a great board and runs Arduino well. My only issue at first is that the pin numbers are not correct / using the same format as Arduino. After a little digging, I found this on Github that maps out the difference.
static const uint8_t D0 = 16;
static const uint8_t D1 = 5;
static const uint8_t D2 = 4;
static const uint8_t D3 = 0;
static const uint8_t D4 = 2;
static const uint8_t D5 = 14;
static const uint8_t D6 = 12;
static const uint8_t D7 = 13;
static const uint8_t D8 = 15;
static const uint8_t D9 = 3;
static const uint8_t D10 = 1;
Refer: https://www.instructables.com/Programming-ESP8266-ESP-12E-NodeMCU-Using-Arduino-/
Refer: https://youtu.be/c0tMGlJVmkw
Refer: https://github.com/thehookup/Wireless_MQTT_Doorbell/blob/master/PinModes_ESP8266_NodeMCU.jpg

Accessing AO - Refer: https://randomnerdtutorials.com/esp8266-adc-reading-analog-values-with-nodemcu/
Instruction & Steps of How to use:
- Download the Arduino IDE, the latest version.
- Install the IDE
- Set up your Arduino IDE as: Go to File->Preferences and copy the URL below to get the ESP board manager extensions: arduino.esp8266.com/stable/package_esp8266com_index.json
- Go to Tools > Board > Board Manager> Type "esp8266" and download the Community esp8266 and install.
- Set up your chip as: Tools -> Board -> NodeMCU 1.0 (ESP-12E Module) Tools -> Flash Size -> 4M (3M SPIFFS) Tools -> CPU Frequency -> 80 Mhz Tools -> Upload Speed -> 921600 Tools-->Port--> (whatever it is)
- Download and run the 32 bit flasher exe at Github(Search for nodemcu/nodemcu-flasher/tree/master/ at Github) github.com/nodemcu/nodemcu-flasher/tree/master/Win32/Release Or download and run the 64 bit flasher exe at: github.com/nodemcu/nodemcu-flasher/tree/master/Win64/Release
- In Arduino IDE, look for the old fashioned Blink program. Load, compile and upload. 8. Go to FILE> EXAMPLES> ESP8266> BLINK, it will start blinking.
Data download access to the website: http://www.nodemcu.com/index_en.html
Firmware link: https://github.com/nodemcu/nodemcu-firmware
Note: Please contact us if you need the driver or meet any issue when using. We provide 100% satisfication service for customers.
ESPDUINO WiFi Setup
Refer: https://github.com/esp8266/Arduino/
Refer: https://github.com/SmartArduino/SZDOITWiKi/wiki/Arduino---ESPduino
You will need to add the following Additional Board Managers URL
http://arduino.esp8266.com/stable/package_esp8266com_index.json
You will need to install the following board library
Tools, Board, "Board Manager"

esp8266Refer: https://github.com/esp8266/Arduino

Polarity of LEDs
https://blog.mruckman.com/2022/03/led-how-to-determine-positive-and-negative/