This is for MacBook 2016 and NOT MacBook 2014
Refer: https://dev.to/cmiranda/linux-on-macbook-pro-2016-1onb

Technical notes, and other ideas.
This is for MacBook 2016 and NOT MacBook 2014
Refer: https://dev.to/cmiranda/linux-on-macbook-pro-2016-1onb
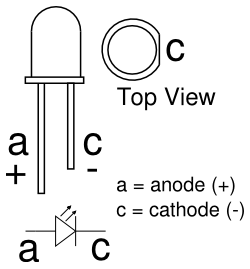
On the physical LED, the longer lead (or leg) of the LED is the anode. The cathode is marked on the rim of the LED body with a flat area shown in the diagram. Another way to tell which lead is the anode and which is the cathode is to look at the two plates at the end of the leads inside the body of the LED.
db.getCollection('cancellationPreferences').find({}).sort({_id:-1}).limit(10);Message from Global Information Security and Compliance Services (GISCS):
It's always best to reset your network password when you first receive the system email announcing it is about to expire, but if you don't get to it in time, you can now reset an expired password without contacting the IT Service Desk and get right back to business.
Here's how: On your personal computer or mobile device (you'll be locked out of your work account on company computers/devices), go to https://aka.ms/sspr and follow the steps to create your new password. Be sure to update your password on mobile devices as well, and write down the site's address so you'll have it when you need it. Also note, you can use this self-service tool to reset your password at any time.
Important requirement
Before you use the new password reset tool, you must have registered for at least two Azure authentication methods (instructions were emailed in November): Microsoft Authenticator app and mobile phone.
If you haven't had a chance to register:
For your Mac or Ubuntu machine *.local is a special prefix to find your local machine on your home network.
cat /etc/hostnameFor example if your hostname is ubuntu2004, then you can access it on your nework if you are running a server as:
Use this to activate or turn off the plug-in. The sound icon on the top bar, now has additional options to change the sound source without having to open the sound interface.
Use: https://extensions.gnome.org/extension/906/sound-output-device-chooser/
The more pins that have interrupts the better.
Refer: https://www.pjrc.com/teensy/td_libs_Encoder.html
Here's a Rotary_Encoder_Library.pdf of the above page.
On the very bottom of the garbage disposal, you can insert a 1/4" allen wrench or a 6mm one, and then rotate it to free the jam. Then flush with water and try to run it again.


Refer: https://forestfireairsoft.com/
Phone: 425.879.2102
Field Address: 17022 Burn Road, Arlington WA 98223
GAMES every Sunday from 10am-3pm
Latest Installation Done on Windows 10
Refer: https://octoprint.org/download/
OctoPrint.org - Download & Setup OctoPrint


Ender 3 OctoPrint settings
Refer: https://howchoo.com/g/ntg5yzg1odk/using-octoprint-with-the-creality-ender-3-3d-printer
While you're setting up OctoPrint, use the following settings for your Ender 3:
Printer settings
Form factor: Rectangular
Origin: Lower Left
Heated Bed: Yes (checked)
Heated Chamber: No (unchecked)
Width: 220mm
Depth: 220mm
Height: 250mm
Axes: Default
Custom Bounding Box: No (unchecked)
Nozzle Diameter: 0.4mm
Number of Extruders: 1
Connection settings
Serial Port: /dev/ttyUSB0
Baudrate: AUTO
Plug-ins
Refer: https://plugins.octoprint.org/plugins/prettygcode/

Older Instructions
I'm using my old Raspberry Pi2 for this Installation. Also, you can backup and restore your settings too, in order to update your Micro SD card being used. I'm doing this to upgrade from an 8GB card to a 16GB card.
Refer: https://all3dp.com/octoprint-setup-raspberry-pi-guide/
Setup Guide to OctoPrint on the Raspberry Pi 2 | All3DP
Step #1 Install OctoPrint Image, first by installing Raspberry Pi Image
Then choose your "Storage" media and then click "WRITE"
Refer: https://www.raspberrypi.com/software/
Now run "Imager", and choose "Other specific purpose OS", OctoPi

The installation has changed a little bit, since it was originally created, update this file now:
sudo gedit /media/mruckman/boot/octopi-wpa-supplicant.txt
Uncomment the lines following this comment, and enter your SSID and Password for your home network
## WPA/WPA2 securedStep #2 Eject and Insert Micro SD Car back into the Raspberry Pi 2
You will need to use the Wireless USB Dongle Too
Step #3 Logon to the Raspberry Ii2 via SSH
ssh pi@octopi.localStep #4 Complete Setup
Password is "raspberry" without the quotes.
Change your password
passwdOnce you are through the passwd tool, run “sudo raspi-config” and hit return on the first option, expand file system, to allow OctoPrint to use the entire space on the SD card for your print files, updates and log files. Then hit tab twice to select “Finish”, and confirm the reboot.
sudo raspi-configChoose "Advanced Options", "'A1 Expand Filesystem, Enruse that all of the SD card is avilable" and hit [Enter] and then "OK"
Then choose, finsh and accept reboot prompt.
Step #5 Octoprint Ender 3 Profile
Ender 3 OctoPrint settings
Refer: https://howchoo.com/g/ntg5yzg1odk/using-octoprint-with-the-creality-ender-3-3d-printer
While you're setting up OctoPrint, use the following settings for your Ender 3:
Printer settings
Form factor: Rectangular
Origin: Lower Left
Heated Bed: Yes (checked)
Heated Chamber: No (unchecked)
Width: 220mm
Depth: 220mm
Height: 250mm
Axes: Default
Custom Bounding Box: No (unchecked)
Nozzle Diameter: 0.4mm
Number of Extruders: 1
Connection settings
Serial Port: /dev/ttyUSB0
Baudrate: AUTO