From terminal to change it to whatever you want: $sudopasswd username
Uninstall VirtualBox Guest Editions
Mount the Additions
VirtualBox:/media/marketing/VBOXADDITIONS_5.0.16_105871$ sudo sh VBoxLinuxAdditions.run uninstall
Multiple Versions of Node
Booking flow needs older version of node until we can upgrade and OLCI needs the current version otherwise the DELETE calls fail, here's how we can use multiple versions:
Refer: https://davidwalsh.name/upgrade-nodejs
Refer: https://github.com/tj/n
# node -v which is v0.10.37 for booking flow, EAS is using 4 and booking flow works
$ sudo npm cache clean -f
$ sudo npm install -g n
$ sudo n 0.10.37
$ sudo n stable
# Now you switch between versions but running, selecting and hitting enter
$ sudo n
Uninstall AKA Delete Apps from Macbook Pro
AppDelete Tool - If an application is protected you have to display the information for it, and change its permissions to read / write in order to delete it.
NOTE: Running applications are protected, you need to stop them first, in addition to changing their permissions. Parallels Access is an example of a running program.
http://freemacsoft.net/appcleaner/
Ubuntu Tweaks for Hardware Installation
https://sites.google.com/site/easylinuxtipsproject/first
$ sudo nano /etc/sysctl.conf
Scroll to the bottom of the text file and add your swappiness value
# Decrease swap usage to a more reasonable level
vm.swappiness=10
$ sudo apt-get install gnome-session-flashback
Log out. In the login window, click on the Ubuntu logo next to your user name (see the screenshot below):
Then click on GNOME Flashback (Metacity). Note: don't select GNOME Flashback (Compiz), because that also has 3D effects, and you want to get rid of those.
Disable advertisements in the Dash and normalize the appearance. Ubuntu shows advertisements in the Dash, whenever you type a query in the Dash.
Click on the grey Ubuntu logo (Dash home). Query: privacy
Click on Privacy - tab Search
Put the slider at OFF.
Click on the grey Ubuntu logo (Dash home). Query: appearance
Click on Appearance - click on the tab Behavior
Check:
Add show desktop icon to the launcher
Fixing VirtualBox Clipboard Issue
Finally I was able to solve my clipboard cut/copy problem in Ubuntu VM.
Here are the steps I followed to solve my clipboard issues.
// Find out the process id used by clipboard. You will two dependent ID created at the time of boot up.
#> ps -ef | grep -i clip
// Kill the process that is running the clipboard
#> kill –9 $ProcessId // Process ID from the process listed from above command
// Execute the clipboard manually.
#> /usr/bin/VBoxClient —clipboard
//Check the id using pstree
// Check the process id again to see if it is running properly.
#> ps -ef | grep -i clip
// Use pstree to check the linking of the processing.
#> pstree -sp $Provide your process id retrieved from above command.
Add existing user to a group
You can modify the group directly on our WINT servers by adding user to group:
$ vi /etc/group
You will need to logoff and logon again, here's an example adding user xxx to tomcat group
$ sudo usermod -a -G tomcat xxx
$ sudo usermod -a -G groupName userName
Getting Gmail to Work Again on MacBook
For me the fix was to disable my anti virus software. In my case it was Avast Mail Shield that was causing the issue. Turned it off and now I can my Gmail account again, at last!
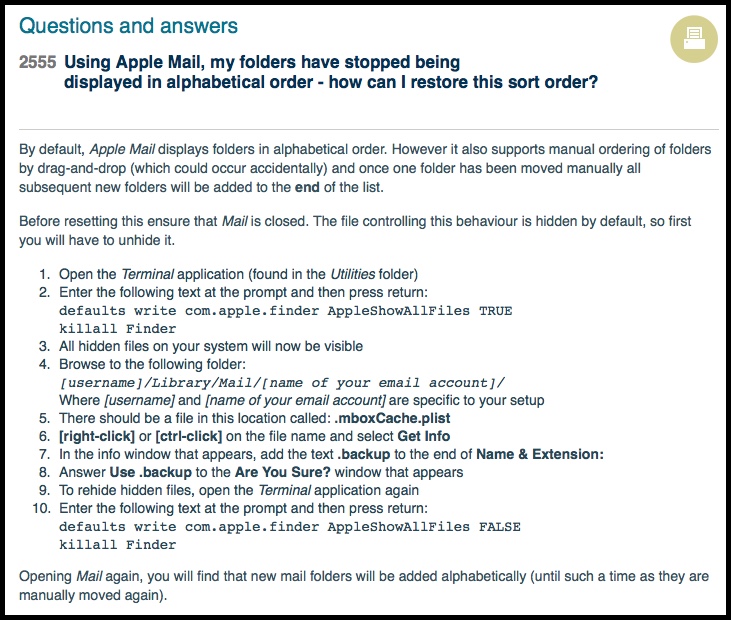
Reset / Re-order Folders on Macbook Email
http://www.sussex.ac.uk/its/help/faq?faqid=2555
You can use the following steps to re-import your email on the Macbook
Open the Terminal application (found in the Utilities folder)
Enter the following text at the prompt and then press return:
defaults write com.apple.finder AppleShowAllFiles TRUE
killall Finder
All hidden files on your system will now be visible
Browse to the following folder in Finder:
[username]/Library/Mail/[name of your email account]/
Where [username] and [name of your email account] are specific to your setup
There should be a file in this location called: .mboxCache.plist
[right-click] or [ctrl-click] on the file name and select Get Info
In the info window that appears, add the text .backup to the end of Name & Extension:
Answer Use .backup to the Are You Sure? window that appears
To rehide hidden files, open the Terminal application again
Enter the following text at the prompt and then press return:
defaults write com.apple.finder AppleShowAllFiles FALSE
killall Finder
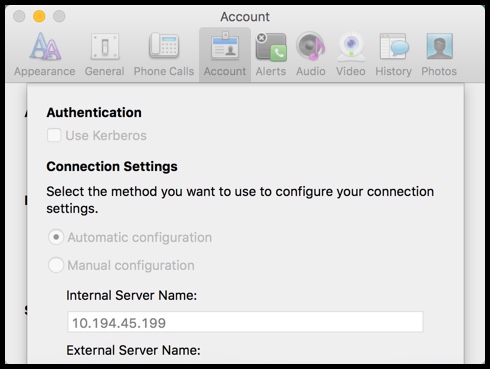
Getting Lync to Work on Mac
Click the "Advanced" button on the sign-in window
Select "Manual Configuration" radio button and paste "10.194.45.199" for the Internal Server Name
Select Ok
Then sign-in with your AD credentials
Reboot laptop and then change it to automatic