https://www.youtube.com/watch?v=v60498O9Q0s
https://pay.ebay.com/rxo?action=view&sessionid=2575078954019

Technical notes, and other ideas.
Navigate to the location of the files to add:
git initAdd the remote repository:
git remote add origin <your-git-repo-url>Note: If your Git repository already has files (like a README), you might need to pull first:
git pull origin master --allow-unrelated-historiesThen you can add and push your changes.
Add all existing files:
git add .Create your first commit:
git commit -m "Initial commit"Push to the remote repository:
git push -u origin masterUse the following for installation of Cursor on ARM
curl -fsSL https://downloads.cursor.com/keys/anysphere.asc | gpg --dearmor | sudo tee /etc/apt/keyrings/cursor.gpg > /dev/null
echo "deb [arch=amd64,arm64 signed-by=/etc/apt/keyrings/cursor.gpg] https://downloads.cursor.com/aptrepo stable main" | sudo tee /etc/apt/sources.list.d/cursor.list > /dev/null
sudo apt update
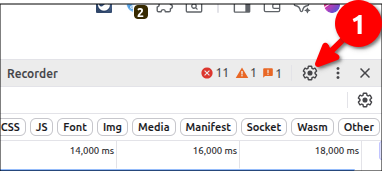
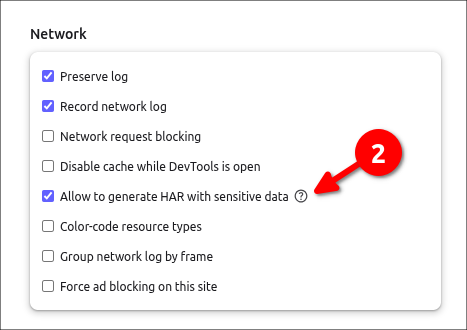
sudo apt install cursorIf you want to capture everything include passwords and parms, you need to turn on this feature because by default it sanitizes the HAR file.
Click (1) for settings
Make sure (2) is checked
Install the Cursor CLI by running:
curl https://cursor.com/install -fsS | bashStart an interactive session with the Cursor Agent:
cursor-agentThis opens a conversational interface where you can describe your coding tasks, review proposed changes, and approve commands.
For scripting or automation purposes, use the non-interactive mode:
cursor-agent -p "Your prompt here"Replace "Your prompt here" with your specific instruction. This mode is suitable for integrating Cursor into scripts, CI pipelines, or other automated workflows.
Cursor CLI includes a Shell Mode that allows you to execute shell commands directly:
cursor-agent shellIn this mode, you can run quick, non-interactive commands without leaving your conversation. Note that commands timeout after 30 seconds, and long-running processes or interactive prompts are not supported.
cursor-agent resumecursor-agent lsThese commands help maintain context across multiple interactions.
Before executing terminal commands, the CLI will prompt you for approval. Ensure you review and approve commands to maintain security.
Go to /Macintosh HD/User/xxx/Library/Metadata/CoreSpotlight
Delete everything within `CoreSpotlight` folder
Empty trash (optional)
Restart computer
Wait a few minutes after logonRefer: https://forum.cursor.com/t/auto-mode-is-not-available/119549/9
I was able to fix, by renaming my current Cursor config folder and then launching the application again.
mv /home/mruckman/.config/Cursor /home/mruckman/.config/Cursor_BAKInstall the Package
sudo apt update && sudo apt install numlockxTurn on Num Lock
numlockx onOpen an Administrator Command Prompt and run:
wmic path softwarelicensingservice get OA3xOriginalProductKeyIf that returns blank, try in PowerShell (Admin):
(Get-WmiObject -Query 'select * from SoftwareLicensingService').OA3xOriginalProductKeyIf still blank, you likely have a digital-only license—no key is needed; just sign in on the new PC with your Microsoft account.
In an elevated Command Prompt, run:
slmgr.vbs /upkThis uninstalls the key from the old machine, freeing up the license.
Option A: Command Line
Open Admin Command Prompt and run:
slmgr.vbs /ipk YOUR-25-CHAR-KEY-HERE
slmgr.vbs /ato
Option B: Settings UI
Go to Settings > System > Activation > Change product key, paste your key, and follow the prompts.
If activation fails, confirm you have a Retail license (Settings > System > Activation) or contact Microsoft support for a manual transfer.